I posted previously about a cool ATTiny project by ELM, which implemented wave table synthesis. After playing with that, I decided that at some point I'd like to take it a little further. That point came last night.
My kids' favourite tune is Twinkle Twinkle Little Star, and we usually sing it at bedtime. I recently picked up a cheap moon-shaped wall-mounted night light from Homebase for £5 (no link, sorry - it doesn't seem to be on their website. Also available from B&Q, but again, nothing on the website), and it's pretty useless in its standard form - the batteries last for no time at all, because it uses an incandescent light bulb. So I decided to put it to better use, and convert it to LED lighting, and to put in a music box version of Twinkle Twinkle at the same time.
It's all well and good being able to place an ATTiny in my universal ZIF ICSP board, flash it, and then put it back in the circuit being prototyped. But wouldn't it be better to be able to flash it in place, without all that tedious plugging and unplugging from sockets?
Well, I could add a 6-pin ICSP header to all my projects, which would make that possible. But it's a bit of a pain to do that, and once the project is complete, that header will never be used again. Seems like a waste.
And so, partly inspired by a post at JeeLabs (although I'd independently been thinking along the same lines), I came up with a different approach - the Frankentiny.
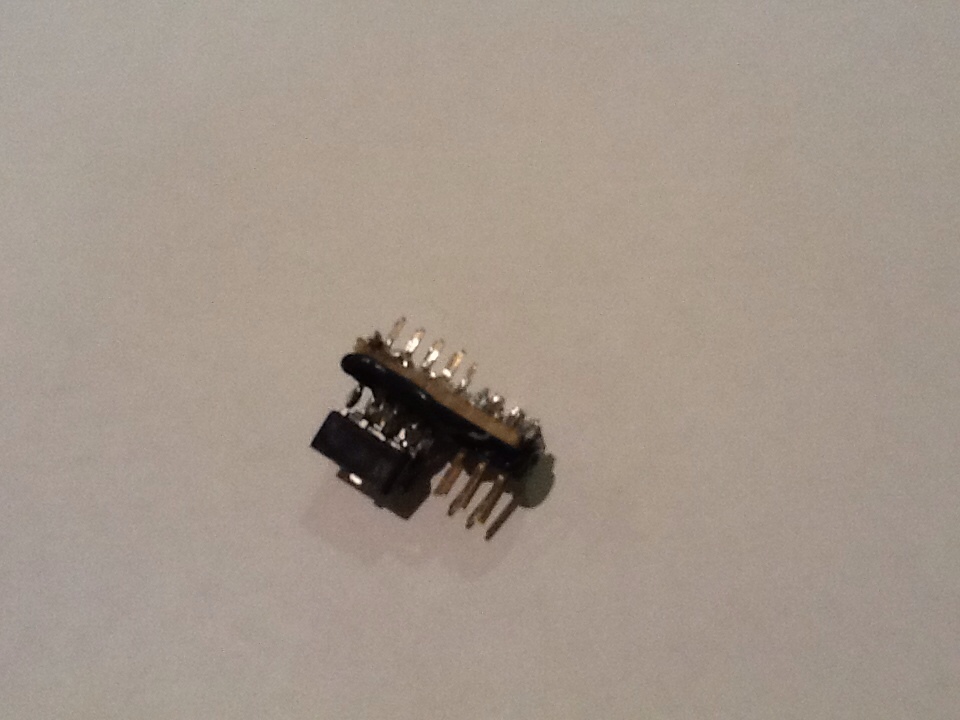
The principle is to create a small daughter board, comprising an 8 pin socket, and ICSP header, which can plug into another 8 pin socket. This way, I can plug the ATTiny under development into the Frankentiny board, and plug that board into the socket in the circuit being developed. When I need to reflash, I just disconnect the power, connect the ICSP cable, and click "upload". As far as the prototype circuit is concerned, this board indistinguishable from an ATTiny.
This takes a little bit of caution to make sure that there are no delicate components connected to the ATTiny pins used by ICSP, but that's not much to ask in return for the convenience.
The previous post discussed my gradual drift to using a dedicated ICSP programmer to reflash AVR chips. This post describes how to make useful ICSP slave boards, to make life easier yet.
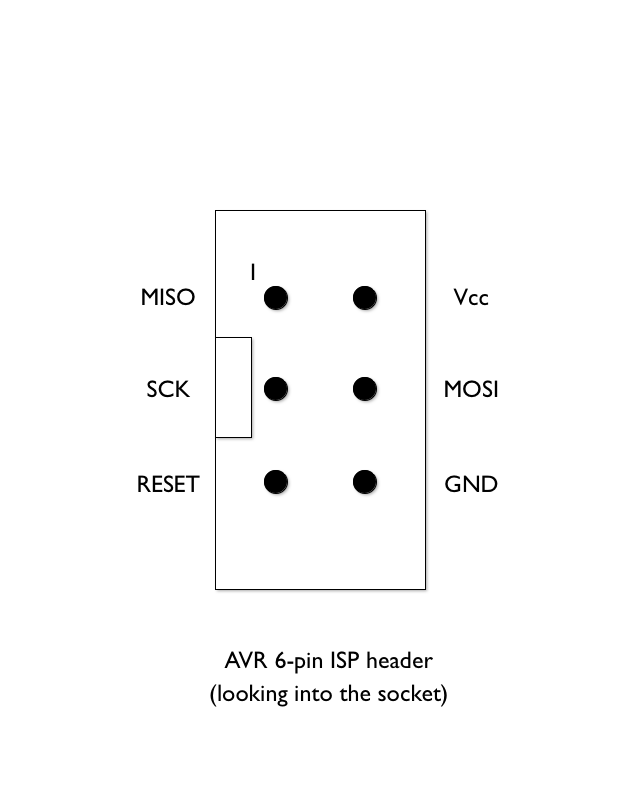
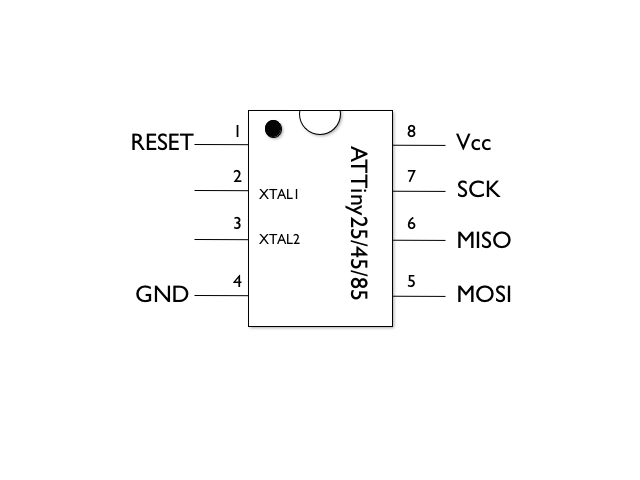
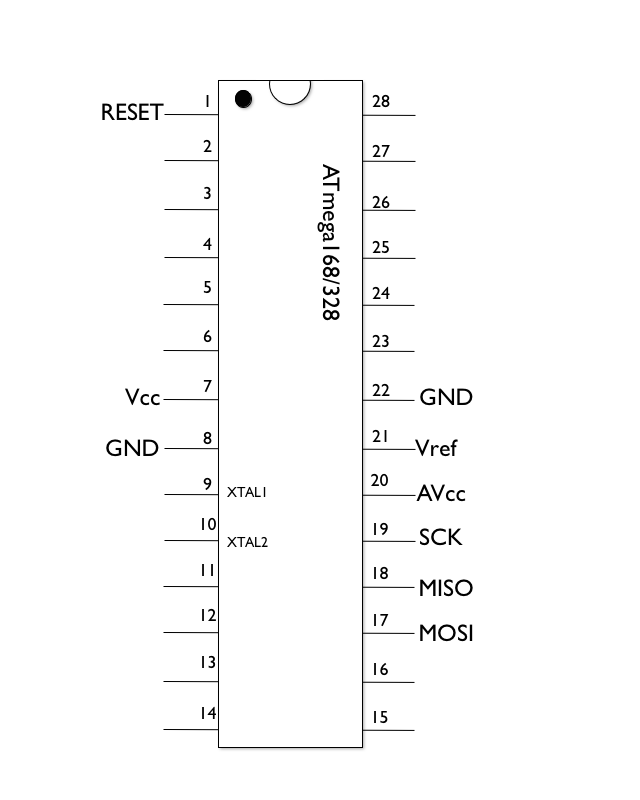
First up, some pinouts. I'm mostly interested in the 6-pin ICSP header, and the ATTiny85 (absolutely tiny, not many I/O pins), ATTiny2313 (a bit bigger, tiny memory, but built-in UART and more I/O pins), and ATmega328 (as used in Arduino). These are all drawn on a Mac in "Shapes", by the way. Another experiment, and it seems OK for basic diagrams, if a little buggy. £2.99 from the App Store.
I've only marked the pins that are important for ICSP. Connecting one of these up to an ICSP header is trivial - just connect the corresponding pin labels together between the ICSP header, and an IC socket. Notes:
If you want to flash an IC that's to be fused for an external oscillator, or already is fused that way, then you'll need to do some work with the XTAL1 and XTAL2 pins before the ICSP master will communicate properly with the slave. For simple ATTiny work, you don't need to bother with external oscillators, but for Arduino, you do.
On the ATmega328, the Vref and AVcc pins also connect to Vcc on the ISP header.
Ah - but see how a lot of the pins are all in roughly the same place and order? Well, I wondered if you could connect up a single socket in such a way that it can be used to program any of these 3 chips? Luckily, we can!
Continue reading "Even lazier ICSP programming"
Larry Wall once said that laziness is one of the 3 main virtues of a programmer. I guess that makes me a great programmer... Anyway, this post describes my ongoing quest to make programming an ATTiny as painless as possible, something that I seem strangely driven to achieve.
First, a note of explanation of the technique behind all of this. AVR chips include functionality called In Circuit System Programming (or ICSP, sometimes shortened to ISP). In essence, this allows the non-volatile memory on the chip to be reprogrammed at any time, even when it's already embedded in a circuit. ICSP works by holding the /RESET line low, which disables the normal operation of the chip, and then manipulating some special data lines to effectively communicate with an in-built primitive bootloader. AVR sell a number of programmer boards that implement ICSP, but they can be quite pricey (~ £50). All modern Arduino boards include a 6-pin ICSP header, clearly labelled, which allows your Arduino to be reflashed in situ, if you have such a programmer. To avoid confusion, I'm going to refer to the device that is generating ICSP control signals as the ICSP master, and the device being programmed as the ICSP slave.
The cheapest way to start programming any AVR chip, assuming that you have an Arduino already, is to use the Arduino as an ICSP master, using a sketch that simulates one of AVR's branded boards. This is all documented very well here.
Important note: The ArduinoISP sketch delivered with Ardunio 1.0 is broken. The easiest solution is to install Arduino 022 alongside your 1.0 installation, and follow those instructions (rather than the 1.0 instructions on the same site).
That works pretty well, but there are drawbacks:
It uses up breadboard space, and takes sufficient time to build the circuit that you won't want to dismantle and remantle every time you program a chip.
You have to upload the ArduinoISP sketch to your Arduino each time. If you're working on a project that uses an Arduino talking to another AVR chip, then you have to keep switching sketches. That's dull.
You can't reflash your Arduino's chip, as it can't be both an ICSP master and ICSP slave at the same time.
Having to install two versions of the Arduino IDE is annoying.